📑 Introduction
Task Scheduler Application built with Laravel, offering a robust solution for managing tasks efficiently. The application includes advanced features such as authentication and enabling both Admin and Standard Users to collaborate seamlessly. Key functionalities include:
- ✅ Admin Features:
- ✅ User Management: Admins can create and manage users.
- ✅ Area/Category Management: Admins can define and manage operational areas for tasks.
- ✅ Job Creation & Scheduling: Admins can create, schedule, and manage tasks, including setting clear timelines, priorities.
- ✅ Task Assignment: Admins can assign users to jobs and link jobs to specific areas, ensuring effective task delegation.
- ✅ Admin Dashboard: Admins can view all tasks, including pending jobs, cancellations, and job status updates on the dashboard.
- ✅ User Features:
- ✅ Job Viewing: Standard users can view the tasks assigned to them.
- ✅ Job Status & Updates: Users can change the status of their assigned jobs and provide remarks about the task progress or completion.
- ✅ Communication: Users can provide feedback and updates on job statuses, ensuring smooth communication with the admin.
This application is designed to simplify task delegation, enhance productivity, and ensure seamless communication between team members and administrators. The intuitive dashboard and ensure both admins and users can perform their tasks efficiently.
🚀 Getting Started
⚙️ Prerequisites
- PHP 8.1 or higher
- Laravel 10.x or higher
- MySQL database system
📦 Installation Steps
- Extract the scheduler.zip file on your server.
unzip scheduler.zip - Create empty database and import sql file placed in zip folder
- Open the .env file in the project root directory and update the database settings:
                        DB_CONNECTION=mysql
                        DB_HOST=127.0.0.1
                        DB_PORT=3306
                        DB_DATABASE=your-database-name
                        DB_USERNAME=your-database-username
                        DB_PASSWORD=your-database-password
Replace:
127.0.0.1with your database host.your-database-namewith your actual database name.your-database-usernamewith your database username.your-database-passwordwith your database password.
🌐 Accessing the Application
Ensure your web server is properly configured to point to the root directory of your project.Visit http://your-domain.com or http://your-server-ip in your browser to access the application.
✨ Features
🔒 Authentication
A default admin user is already created, enabling secure access to the system. The admin can then manage user accounts, assign user types (admin, standard user), and oversee system configurations.
👥 User Management
Admins can manage users, set User type (admin, standard user), and set user type based on their needs. The following functionalities are supported:
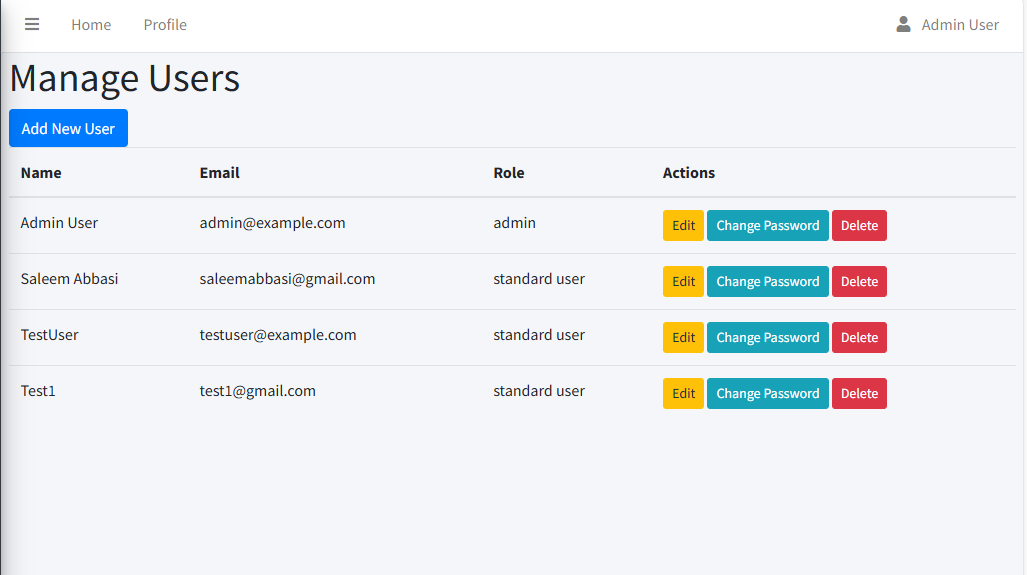
- Add New User: Admins can create new users by entering details like name, email, and password. They can also set the user type (e.g., Admin or Standard User).
- Delete User: Admins can delete users from the system, removing their access and associated data (if applicable).
- Change Password: Admins can reset a user's password by entering a new password and confirming the changes.
Example User Management UI:
Below is a screenshot of the user management interface where admins can manage users, user type, and update passwords:
🌍 Area/Category Management
Admins can manage areas, including creating, updating, and deleting areas. Each area has a name and color, which helps in visually identifying them. Areas are assigned to tasks to streamline organization and workflow.
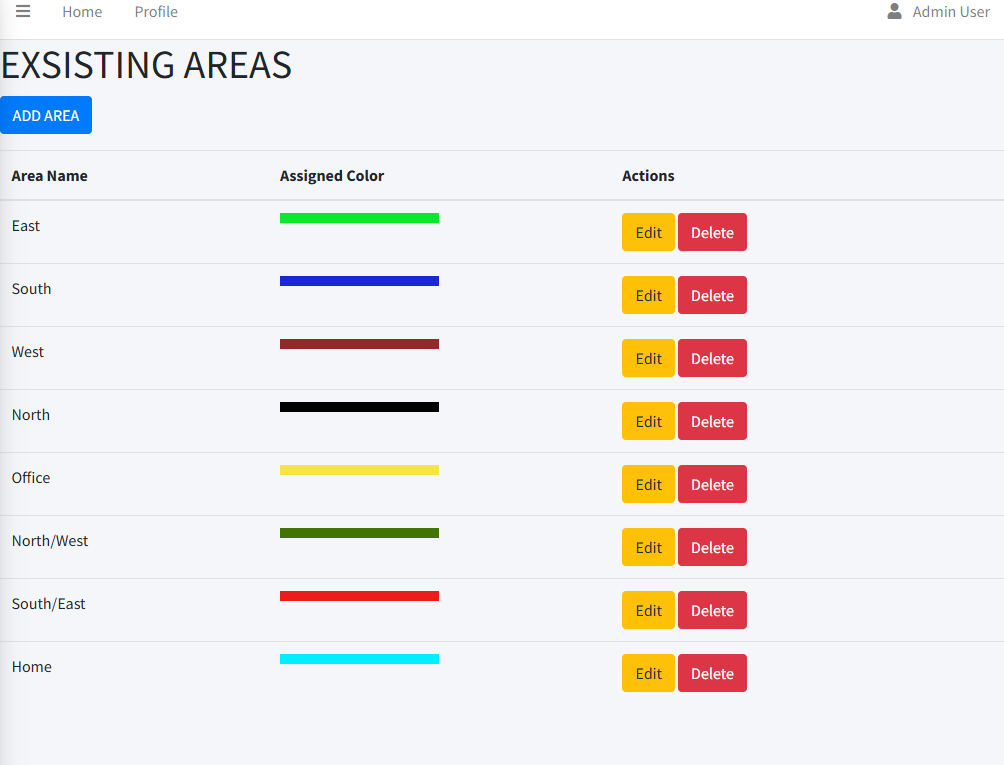
- Create New Area: Admins can define a new area by providing a name and selecting a color for visual distinction.
- Update Area: Admins can modify an area's name or color after creation.
- Delete Area: Admins can remove an area from the system.
Example UI for Area Management:
Below is a screenshot of the Area Management interface where admins can create, update, and delete areas:
📅 Schedule Management
Admins can manage schedules by creating new schedules, assigning areas to them, and assigning users to specific tasks. This helps streamline task management and ensures efficient job execution.
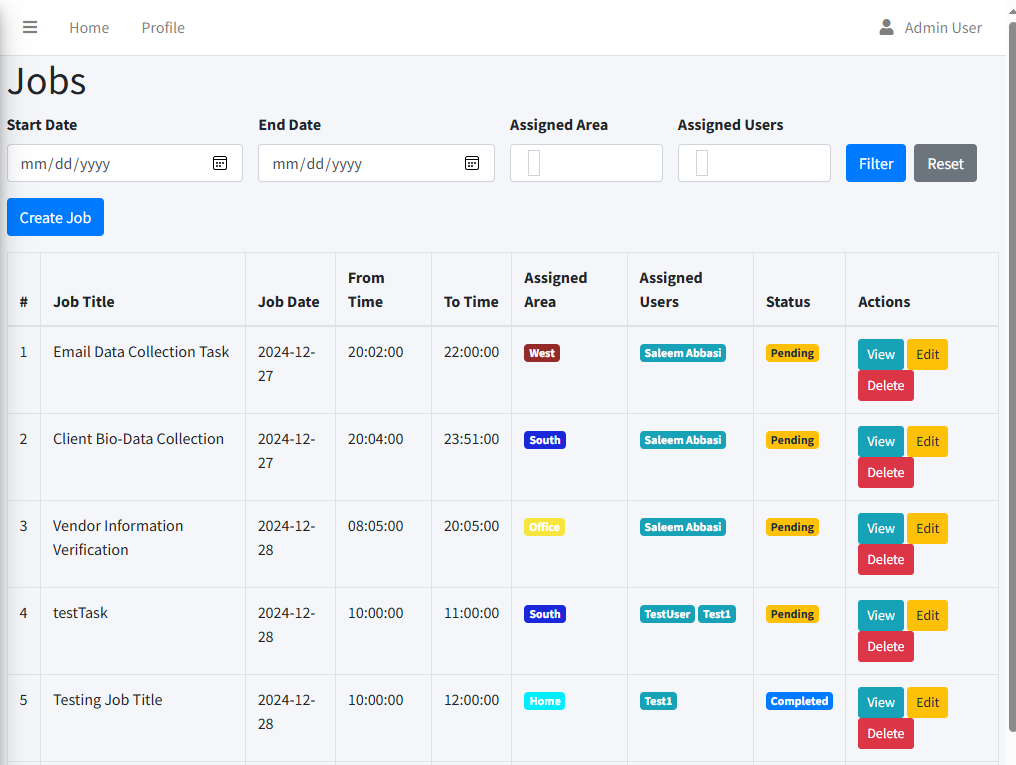
- Create Schedule: Admins can define a new schedule with details such as date, time, and task description.
- Assign Area to Schedule: Admins can link a schedule to a specific area, ensuring tasks are completed in the correct location.
- Assign Users to Jobs: Admins can assign users to specific jobs within a schedule, ensuring proper task completion by the right personnel.
- Manage Jobs: Admins can modify, delete, or reschedule jobs, as well as mark them as completed once finished.
Example UI for Schedule Management:
Below is a screenshot of the Schedule Management interface where admins can manage schedules, assign areas, and handle job assignments:
👨💻 User Features
Standard users can view and update the status of jobs assigned to them. They can also provide feedback or remarks to ensure communication is clear between the admin and team members. The following functionalities are available for users:
- View Assigned Jobs: Users can view all the jobs that have been assigned to them.
- Update Job Status: Users can change the status of a job (e.g., In Progress, Completed, Pending) as they work on it.
- Provide Remarks: Users can leave remarks on the status of the job to keep the admin informed about their progress and any challenges encountered.
Usage
Logging in
To log in, navigate to the login page and enter your credentials. Below are the credentials for the default admin user and standard user:
                    Admin:
                    Email:admin@example.com
                    Password:Admin@123
                    Standard user:
                    Email:demo@example.com
                    Password:Demo@123
Depending on the user type, access levels vary:
- Admin Users: Admin users gain access to the user management dashboard, where they can manage user accounts, create areas, assign jobs, and oversee the entire system's operation.
- Standard Users: Standard users can view the jobs assigned to them on the calendar. They can update job statuses, submit remarks on jobs, and mark tasks as completed or canceled as required. However, they have limited access to administrative features.
Dashboard Features
The dashboard provides an overview of task assignments, job statuses, and recent activities. Key features available to users are as follows:
- Admin Dashboard: Admins can access a comprehensive overview of all tasks, view job statuses, and monitor recent job activities. The dashboard includes totals for pending, completed, and canceled tasks.
- Task Management: Admin users can create new tasks, assign them to users, and link tasks to specific areas. Admins can also edit or delete jobs as needed.
- User Management: Admins can create new users, update user type (admin, standard user), and delete users from the system. They can assign jobs to users and track their progress.
- Area Management: Admins can manage operational areas, including creating new areas, updating existing areas, and assigning tasks to specific areas to streamline job assignments.
- Calendar View: Both admins and standard users can access a calendar view that shows all assigned jobs. This helps in tracking and managing the schedule effectively.
- Status Tracking: Standard users can view jobs assigned to them and update their statuses. They can mark tasks as completed, in progress, or canceled and add remarks related to the tasks.
Common Issues
Here are some common issues and their solutions:
- Issue: "Database connection failed."
Solution: Check your `.env` file and ensure the correct database credentials are provided. Make sure the `DB_HOST`, `DB_USERNAME`, `DB_PASSWORD`, and `DB_DATABASE` fields are correctly set for your environment. Test the database connection using the appropriate commands for your database type. - Issue: "Page not found."
Solution: Runphp artisan route:cacheto refresh the route cache. If you're using custom routes, verify that the route file exists and contains the correct routes. - Issue: "Artisan command not found."
Solution: Ensure that you're in the root directory of the Laravel project. You may also need to clear the cache by runningphp artisan config:clearorcomposer installif dependencies are missing. - Issue: "Unable to create a new user."
Solution: Ensure that the `User` model and database table are properly set up. Double-check that the fields like `email`, `password`, and `usertype` are correctly defined in the form and the database.
FAQ
Here are some frequently asked questions:
- How can I reset my password?
Click on "Forgot Password" on the login page and follow the instructions. You will receive an email with a link to reset your password. - Can I use this application for multiple projects?
Yes, you can customize it for multiple projects by adjusting the settings, creating different user types, and adding specific areas or tasks related to each project. - How do I assign users to specific jobs?
As an admin, navigate to the "Jobs" section, select the desired job, and assign a user to it. Ensure the user is created beforehand in the "User Management" section. - Can I view pending and completed jobs?
Yes, admins can view all pending, completed, and canceled jobs on the dashboard, categorized accordingly. Standard users can view their assigned jobs and update their status. - How do I change the area linked to a job?
As an admin, you can edit the schedule and reassign the area to a different location. Navigate to the "Schedules" section and modify the job's assigned area. - How do I add new users to the system?
Admins can add new users via the "User Management" section. Enter the user's name, email, password, and assign a user type (Admin or Standard User).
Support
Bug Reports
If you encounter any bugs or issues with the application, please provide a detailed report. Your report should include a clear title, a description of the issue, and any steps to reproduce the problem. Additionally, including screenshots or error logs will greatly help us resolve the issue more quickly.
Feature Requests
If you'd like to suggest a new feature, feel free to let us know. While we do welcome new ideas, please note that feature requests should be focused on improving the general functionality of the application. We do not handle individual customizations or specific user requirements.
Contact
If you need further assistance or have any questions, feel free to get in touch with us:
- Email: rakali2011@gmail.com